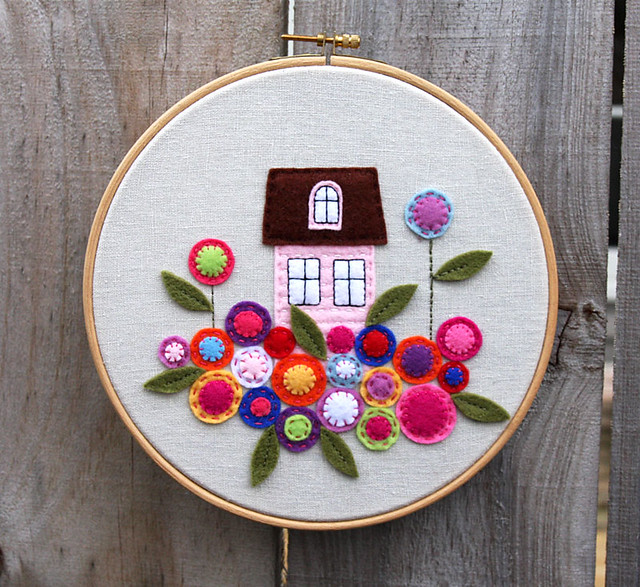
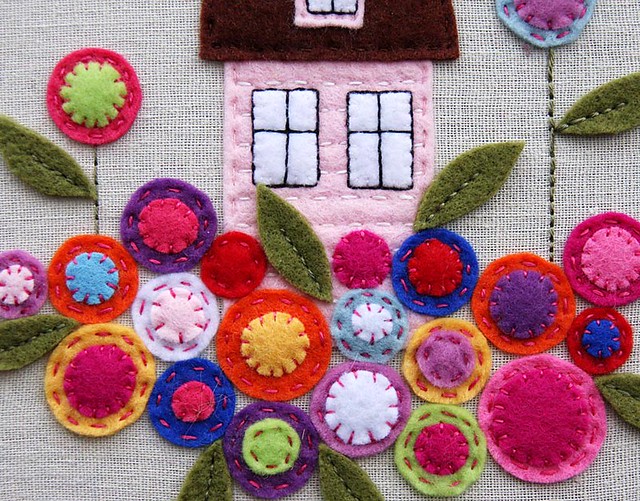
My hoop was a bit bigger so I ended up with more circles to fill it up - plus I just couldn't seem to stop adding them in! I obviously have a bit of a 'thing' for felt circles - if only there were an easier way of cutting them than by hand. Any suggestions? I wondered about the circle templates and cutters you can get for papercrafts but not sure they'd go through felt. Anyways, great fun choosing the combinations, even if I did fret and change and curse trying to decide on colours at night! Which you can't really, so most of the choosing happened during the day and most of the sewing at night.
Love the whole thing, it's just gorgeous! Originally I intended it for Hazel's room. Then I decided I wanted it, and then she decided she wanted it. So now it's in her room. Typical really.
It is gorgeous! So glad I saw it finished :)
ReplyDeleteI've just brought a heap of felt to give some felt embroidery a go - along with every other WIP I have in my Narnia.
Cat
lovely! And if you ever figure out a more fun way of cutting out felt circles than doing the little suckers by hand, I'd love to hear about it!!!
ReplyDeleteThis is seriously cute; all those colours together make me all giddy!
ReplyDeleteDid you hang this in a frame, leave it in the hoop or something else? I'm curious of the end result. It's just adorable! Love it!
ReplyDeletelove it! i've been meaning to try this since the tutorial came out & everytime i look at checkout girl's blog! you've inspired me to do it sooner! (also love that we spell our name the same way- hardly anyone spells it this way!!)
ReplyDeleteThat is adorable.
ReplyDeleteOlfa makes a circle rotary cutter that adjusts like a compass. It won't do teensy ones but adjusts from about quarter size up to 6". Very cool toy!
ReplyDeleteSew beautiful. This has given me great inspiration! Great work.
ReplyDeleteReally lovely!
ReplyDeleteIt's me---the tutorial maker herself, and I have to say this is the best rendition I've seen! Your stitches are gorgeous!
ReplyDeleteWow! It was such an enjoyable project and I'm immensely pleased you think I did a good job :) I see it hanging in Hazel's room every day and it still gives me a moment of pleasure each time I notice it. Not all projects manage that, even if they turn out well, but this one certainly did. Thank you for creating and sharing it!
ReplyDeleteSooooo Beautiful!!!
ReplyDeleteThanks so much! It's a great tutorial :)
ReplyDeleteThis is so cute!
ReplyDeleteLove it and added the tutorial to my every increasing list :). I read somewhere that you can use a Cuttlebug with a circle template to cut felt, will try and find it again and will let you know :)
ReplyDeleteJacqui - its amazing! It looks really wonderful and now you will have to make yourself one too.
ReplyDeleteThe best way to cut circles is to use a sizzix big shot and some nestabilities - which are dies in all shapes and sizes. They will cut through felt, fabric, cardstock and all sorts of different things! Once you see all the shapes you can cut easily, it will totally change your felting life!!!
ReplyDeleteI don't know if the craft stores in NZ have the bigshot but you can definitely get one through Stampin Up: http://www3.stampinup.com/nz/enz/
It's best to order the nestabilities from craft sites based in the US - they are light and flat so they are easy to ship. Even including shipping costs and the exchange rate, they end up being about half the price of the ones in craft stores in Australia. Try http://www.7kidscollegefund.com/ or http://www.allthatscraps.com/index.php?main_page=index&cPath=957&zenid=af1e852c5d4bdfc6389e7873c00fc618
this really is so sweet. I'd love to make one someday, that may be a while...
ReplyDeleteyou did a great job.
:)
It's perfect!
ReplyDeleteThat is sweet! Love.
ReplyDeleteThanks! I just left the whole thing in the hoop where I did it, and trimmed
ReplyDeleteand glued the fabric to the hoop at the back to hold it in firm. I should
have paid slightly more attention to my placement of the house when I did it
as it's slightly wonky and then of course you can't really reposition it
without major hassle. But it's a great way to display embroidery, I really
like it. The tutorial for doing the pink house has an explnation of how to
do the gluing at the very end, it's worth a look. I've hung the hoop up on
the wall with just a small nail that slips through the metal fixtures and it
hangs there very nicely.
Thanks! I'm pretty fond of it too.
ReplyDeleteThank you so much! I'll have to investigate next time I'm contemplating felt
ReplyDeletecircles.
Yay! It's such a cute project I think everyone should do it.
ReplyDeleteIt's been a long time, but I just saw this--you're welcome! :-)
ReplyDelete